Thursday, 18 January 2018

How to Paint Your Second Hand Dollshouse

Why is it that most dollhouses seem to be smothered in pink paint!

Here are some quick tips for repainting your second hand dollhouse.

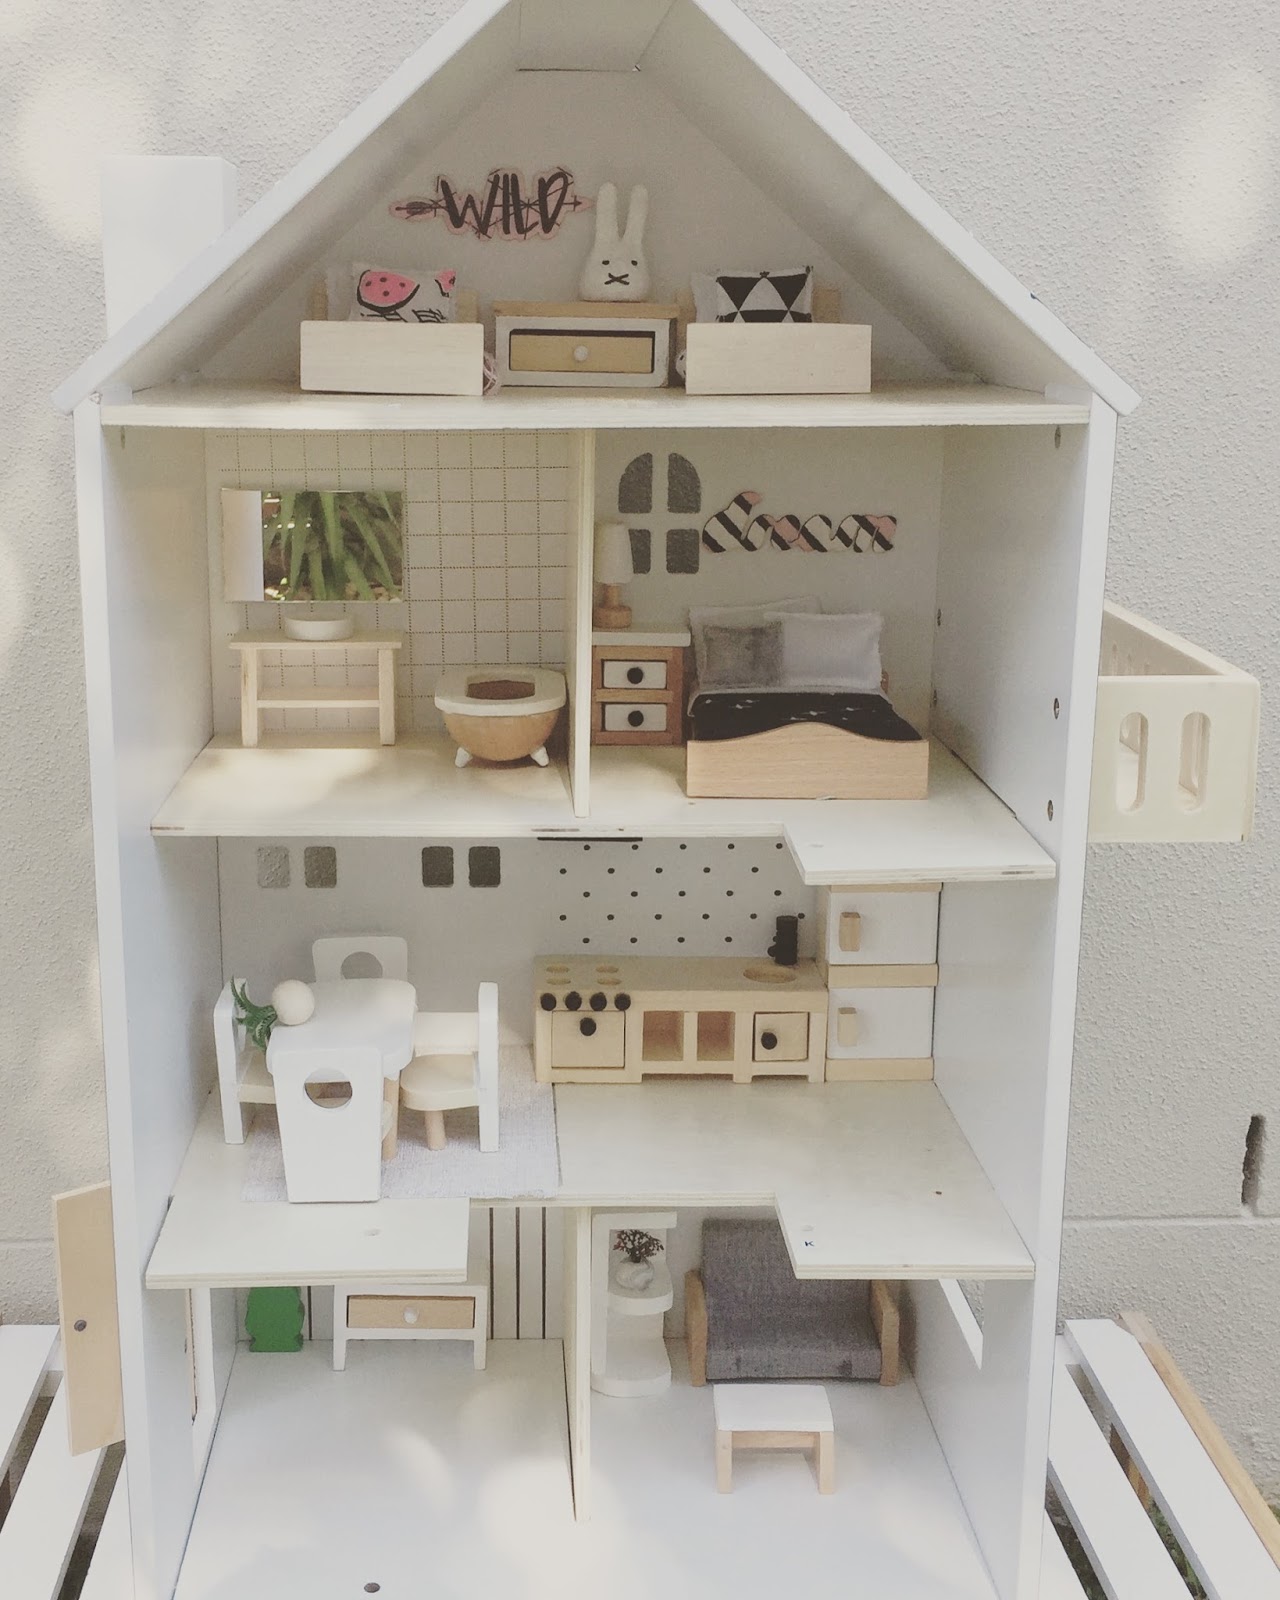
I picked up this cute little house from Gumtree for an absolute bargain!  But this house has so much more potential and will look a lot better once the pink and blue are gone and it is given a fresh modern coat of paint on the exterior.

Take time before you start to map out what parts you want to paint.  Consider the interior walls and floor as well.  Repainting the whole house is a time consuming task, each wall will need about 4-5 coats of paint, so think about whether you can keep the fake woodgrain flooring or whether you want the whole house start white.  Remember to take 'before' photos, this helps when decided what parts of the house will be painted what colour and putting it all back together.


WHAT IS YOUR HOUSE MADE OF?

Most of these houses are made from wood.  They have an MDF base (which is a very plain ugly manufactured brown wood with no natural grain in it).  The wood is then painted or sometimes, the MDF planks are covered in very thin paper stickers (which have photos printed on of fake windows, wood grain flooring etc).  

PULL IT ALL APART ...

It is definitely easier to sand and paint when it is taken apart.  Make sure you take before photos of the interior and exterior so you know how to put it back together.  Put all the screws and hinges in a small container with a lid to keep them safe.

If you can take out the windows and doors this will also make your job easier.  This house had plastic windows so I managed to pop them off with the help of a box cutter.  I gently ran it around the windows to cut through the glue.  Be careful using a sharp knife however, and the MDF board is very soft and you can easily damage it.

SANDING

To get the best outcome when repainting your house you really need to sand off the original paint.  This is where I suggest you beg, borrow or buy an electric sander.  I use an orbital sander as shown in the first picture above.  I use a medium course sanding disk (80 grit) and this takes the paint off fairly quickly.  Make sure you map out what parts of the house you want to repaint, sometimes the interior floors are already painted a woodgrain and can be kept. 

Again if you have taken the house apart you can sand right to the corners with no trouble, take note whether you need to sand both sides or just one side.

PAINTING

To get the best finish, you need to use a gloss based paint.  If you use just a plain old wall paint or even a semi gloss, it dries chalky and marks easily.  You can definitely get away with a semi gloss paint but it will have a slightly rougher feel to it once dry.  If you don't have any paint laying around you can buy small test pots from the local hardware department off the shelf in white.  It wouldn't hurt to talk to someone in the paint department to ensure you you get the best product for your project.

I used a small roller and off the shelf black and white gloss paint from a tin.  Im not going to lie, this is a time consuming and tedious task.  You will literally need 4-5 coats to over the brown MDF wood and create an even finish.  In warmer climates you might get away with painting 2 coats at a time.  I usually paint one side of the MDF and rest it up against a wall to dry, working through all the pieces painting only one side first.  Then go back to the first plank of wood which should now be partially dry on the back and paint the reverse side, remember to paint the edges of the wood as well.

For the whole front panel which contained the front door and the windows, I removed the windows and doors first and rolled on a few base coats of tinned paint.  I glued all the plastic windows and doors back into the frame (using a good quality craft glue pictured above) and then finished off with Rustoleum spray paint in white gloss.  (As shown in the picture above, this spray paint works well on plastic).  Spray paint is not necessarily the easiest option.  It can be tricky to get it right, including not shaking the can properly before use, spraying too close and causing the paint to run, spraying when its too humid and the paint will crack, and of course you cannot lay a single finger on it until it is dry as it marks very easily.   


Thursday, 26 January 2017

No Sew Bedding


How to make dollhouse bedding without a sewing machine

You will need:-

- Good Quality Craft Glue or Fabric Glue (See my post on glue options here)
- Different fabric scraps to use as your bedding
- thick cardboard or poster board

Cut your fabric slightly larger than the size of the bed you require it to fit.

To give the effect of a sheet folded over a blanket/duvet cover, you can fold a plain white strip of fabric over the top of your chosen patterned bed cover.

You can simply glue the edges together with fabric glue so that you do not need to use a sewing machine.
 Fold the white 'sheet' over the top edge of your patterned fabric to create the look of a turned down bed.

I placed a small amount of quilting filling between my sheet and the poster board so that the bed looks nice and comfy, but you could also just fold some more fabric under the top cover to make it look a little more 'plump' as well.


Cut a piece of cardboard to fit your bed like a mattress, (so that it sits neatly on the top of the bed).

Fold your fabric over the cardboard and tuck the ends in similar to wrapping a gift.  You do not need to make the underneath all too tidy as you can stick it directly onto your bed base as shown in the diagram below.

You can also make some cushions using fabric glue.  The black and white cushion below is just a length of fabric rolled in a cylinder shape and glued along one edge.


Hanging Mirror

How to make a miniature hanging mirror

You will need:

Round Mirror (best place to find one of these is inside your make up compact case)
Orange Power Glue remover (or similar product which dissolves glue)
Poster Board or craft cardboard
Fast setting glue.

If you plan on using the mirror from your make up compact, the best way to detach the mirror is with using Planet Ark Orange Power stick spot glue dissolver.

Start by placing a few drops of glue dissolver around the edges of the mirror.  Using a knife or box cutter very gently slide the blade between the mirror and the compact so that the glue dissolver and run under the mirror to reach the glue.  Keep adding drops of glue so that it can run underneath the mirror.  Be patient and give the glue dissolver time to work.

Keep using the knife to gently try and pry the mirror off.

Once you have the mirror free from the compact you can measure a length of cardboard to use as your mirror hanger.

Use fast setting glue to attach the length of cardboard to the edge of the mirror - in effect the cardboard is just for show.  Always attach the mirror directly to the dollhouse as it is heavy and should be secure from children prying it off.


Miniature Sofa

How to make a miniature sofa from the Ikea Flisat Box

The cardboard that forms part of the packaging for the Ikea Flisat Dollhouse is perfect size to make a quick sofa.

You will need:

- Cardboard Packaging
- Fabric Glue/good quality clear setting craft glue
- Fabric scraps

Using the thick cardboard that comes inside the box, cut out the following shapes which will form the base of your sofa.  It is best to use a box cutter and ruler to cut through the thick cardboard and use a ruler to make sure you cut straight lines.
All the pieces should fit together so that your sofa will look like this.  Do not throw away the left over cardboard just yet, as you can use the leftover for a bed and I also use another piece of card on the bottom to make the sofa a little bigger.
You need to wrap the cardboard in fabric, which is the tricky part!  I find the best way to cover the cardboard is using the following technique.  Cut a square of fabric large enough to fold over the entire piece of cardboard.  Make 2 cuts in the fabric as shown in the diagram on the left.  (Cut the fabric on each side).
You will need to fold the fabric up and 'wrap' it around the sides of the cardboard.  You will see the the remaining fabric is a rectangle shape and will fold over the top of the piece you have just stuck down.  You can trim off any excess fabric once the glue has dried.  I should have used a lighter fabric as the black does not show up the detail very well!
With the base of the couch you only need to cover one side nicely as I use another piece of card underneath to cover the messy side.  Essentially you are making a sandwich with all the messy ends stuck together in the middle.


When I finished making the top I realised it was a little small so I cut another rectangle to go underneath to make it higher. Use the same technique as the instructions set out above - and stick all the ugly messy pieces together in the middle.


One you have covered all the pieces in fabric glue them all together to form the sofa shape.  Once the glue has dried you can trim off any stray threads and tidy up any dried glue.

Decorate with some cushions.


Monday, 21 November 2016

Jute Rug Tutorial


Step by step instructions on how to make a modern Jute Rug for your dollhouse.

What you will need:

- Thin cardboard (cereal box or similar) or thick scrapbooking paper ;

- Ruler;

- Jute rope;

- Double sided tape OR craft glue OR hot glue gun;

For the rug in this tutorial I used my glue gun - and now I have thrown it in the bin.  I don't know who thought a hot glue gun is a good idea but I personally think they are rubbish!  I thought  it might hold my super heavy duty Jute rope better (which I guess it did....) but they are just sooooooo messy, and you need to work very quickly as the glue drys way to fast, especially for this task which is a little tricky and you need a bit of time to make it look nice.

I have made jute rugs in the past and I think the easiest option is to use double sided tape, especially if you are using the thin Jute string.

Step 1

Start by measuring the space you want the rug to fit into so you can map this out on your cardboard.

Step 2

Draw a cross in the middle of your cardboard to give you a starting point and a guide to keep your circle even once you start glueing the Jute string down.  If you deicide to use double sided tape, which I would suggest as being the easiest way of doing this for first timers, start by laying the tape out on the cardboard in a asterisk (*) shape.

Place one end of the string across your centre +, you want the 'tail' to be a little long so that you can 'run it over' with your coil and this will hold and hide the end of the string in place.


Step 3

Start sticking the string down, wrapping it around itself.  If you are using double sided tape you can take your time to ensure you are keeping your circle even, and if you go a bit wonky it is easy to pull the string up and lay it back down again.


Step 4

Now if you have had enough of gluing and sticking string down you can simply stop at a simple circle shape.  (see step 5 on how I finish off the end to stop it unravelling).

But if you want to make it look a little more fancy, you can add smaller circles.  Start by laying one out to decide how big you want the decorative feature to be, then cut 10-15 strips of jute to the same size (you may require more or less).  Cutting lengths of jute for the smaller circles makes the jute easier to work with, as well as helping in getting similar sized circles.

Keep going all the way around, try to keep turning the rug so you are working on the space in front of you, adding the smaller circles around the boarder can be a little more fiddly but don't worry too much about the 'tail' ends and where they end up because if you do a 'boarder' you can 'run' them over and tuck them away.

You will see that some of my circles go in opposite directions, but just do what is easier for you as once you lay the boarder you can't really tell which way the circles are running.


Step 5 

To finish off it is best to try and tuck the 'end' back under the outside coil.  If you can get it tucked back in towards the middle of the rug you can just tape it to the under side of the rug.

Below are 3 different rugs which I have made, The first rug is made of 3 different types of string, Jute lace (found at the local junk shop) jute string, and cotton string.
Bottom rug is just thin jute string held down with double sided tape.  The big rug is made from jute rope and I just the hot glue gun as this string was far too heavy for double sided tape.


Sunday, 20 November 2016

Keeping it together

Which glue should I use?

I have had a lot of people ask me about which glue to use for various aspects of your dollhouse renovation.

And the easy answer is that there is one glue which I use for everything!

I recently brought a hot glue gun thinking I should invest in a serious tool for the amount of crafting I do and I was extremely disappointed.  Its messy, and it does not hold very well at all.  So if you were thinking of spending money on a hot glue gun, forget it!

Head to your local hardware store (Bunnings) or craft shop (Spotlight or Lincraft).

The best glue to use is a premium craft glue.  These craft glues bond pretty much everything and anything, fabric, balsa wood, poster board, scrap pad paper....

Hanging Wallpaper

The best way to give your dollhouse some character is by hanging some wallpaper.  My best tips for wallpapering your dollhouse are to use scrapbooking paper, again you can buy a whole book of scrap paper from your local craft shop (Spotlight, Lincraft and even Big W and Kmart sell a great range as well).  If you are after a wall tile print don't forget to check out my etsy shop.  If you decide to use normal xerox paper for wall paper this is also fine as long as you don't try and use childrens paper glue.  If you try and use cheap paper glue it may make the toner ink run and it will not stay stuck for long!

You really only need to dap a few decent sized dots of glue in each corner and a few through the middle.  If you are using a good quality craft glue this will be more than enough to hold it on the walls and also will not cause too much damage if you change your mind and want to remove it.

My two favourite options:

450 quick dry glue (I have purchased from Spotlight)


Boyle Craft Glue from Bunnings.  Both retail under $10 and will be more than enough to get you through a basic dollhouse reno.


Wednesday, 16 November 2016

Dollhouse Buyers Guide

So you want to buy (your child) a dollhouse.

You literally just walked through the door with your brand new baby girl, take a seat on the couch to research instagram for the latest and greatest baby products and you come across the modern dollhouse revival.

Firstly, YES of course you need a dollhouse in your life, (your two week old daughter may take a little more convincing) but hey, lets be honest this dollhouse business is not all entirely for the kids!

Where to start?

Serious consideration should be taken as to the type of house vs the age of your child.

Factors to consider:-
- Will the child actually play with the house
- Is the furniture and accessories safe and/or durable
- Are you going to paint/modify the house (re painting a house can be a lengthy process)
- How much money do you plan to spend

Also note that when buying these houses they are childrens toys and although I mention the scale as 1:12 they are a bit all over the place.  What I mean is that you will find that the ceiling height maybe very high and you only have a small amount of floor space.  The only dollhouse which is true to scale is the Lundby and their accessories.

I have given a brief run down on 4 options which are all available in Australia as I have owned all of theses houses so find it easier to give a review of them.  There are numerous other brands available which you should also research, not to mention local Instagram and Etsy stores.

The Kmart Dollhouse
A great starting point for very young children would be the Kmart dollhouse.  It is well priced for the quality, it includes some furniture and most of all it is pretty indestructible.  Should you wish to pretty it up a bit read my blog on The $100 Kmart Dollhouse Hack.  The Kmart house would suit 1:12 scale furniture, although the rooms are very small so you will not be able to fit too much into it.  Stick to buying the wooden furniture packs (i.e.; Le Toy Van, Hape or Saint Germaine).


Adairs Kids Heidi House
Next best option for beginners is the Adairs Heidi House, and you can buy a set of wooden furniture that goes with it.  This option is much larger than the Kmart house, the rooms can fit considerably more furniture into them.  Again for smaller children stick to the wooden furniture packs, but this house will easily accommodate any 1:12 scale dollhouse furniture.


IKEA Dollhouse Shelf
For some reason IKEA designed this as a bookshelf but it works brilliantly as a dollhouse.  Again this house is on the smaller side as it only has 4 rooms, and it is not very deep.  Will suit either wooden furniture packs or 1:12 scale furniture.  The advantage of this house is that it can be easily painted as it has a wood finish.  The other houses will need to be sanded and primed before they can be painted.


Lundy Smaland or Stockholm

I have owned both the Smaland and the Stockholm and loved both of them for different reasons.  The Smaland has plenty of rooms, and realistic opening doors and windows.  On the other hand the Stockholm has that amazing draw which hides a swimming pool (capable of holding water!!) and the trendy modern layout with rooftop verandah.  The only downside to the Lundby is that because of the 1:16 scale you are a little more restricted as to your furniture options and are best to stick with buying original Lundby products.  As the 1:16 scale is slightly smaller the Lundby (in my opinion) would be better suited to older children (say 4 years onwards) only because the Lundby furniture has far more detail and would be more practical for older kids.


Filling your house with modern minis
Once you have decided on the type of house you think will best suit your needs, you can finally move on to decorating it.  As I mentioned before, these houses are toys so scale can play up a bit when trying to figure out whether furniture is going to fit into your rooms.

First of all if you want to paint your house decide this first as it is fair easier to paint a house while it is deconstructed.  If it is already painted you will need to sand it first, prime and then paint.  This is a huge task so really take this into consideration when buying a house.

Start with deciding on whether you want to change the wall paper, try to use scrap booking paper and a good quality craft glue for the best results.  Flooring can be laid using balsa wood and I have a 'how to' on my blog.

Even if you buy all your major furniture pieces in packs, seek out local makers for all the pieces that really give it the modern twist, like miniature plants, floor rugs, wall art and of course bedding, cushions and throw rugs.

There are so many amazing mini makers on Instagram and Etsy so make sure you shop around and support your local mini makers!!!

Dollhouse comparison table


Scale
Furniture included
Age
Can it easily be renovated
Stairs
KMART
1:12          
Yes
2+
Yes
Yes
IKEA
1:12
No
2+
Yes
No
ADAIRS
1:12
Extra
2+
Yes
Yes


LUNDBY
1:16
Extra
4+
Wallpaper only
Yes

Sunday, 2 October 2016

Malibu Beach Dollhouse Kit


After several attempts at trying to build my own modern dollhouse (and failing!), I decided to splurge on the Malibu Beach Dollhouse Kit from The Dollhouse Emporium in the UK.  The reason for choosing this house, pretty simple, it was on sale and they would actually ship it to Australia.  There are several other houses which I found and really loved the design of, but actually being able to buy one and have it delivered was another story.  My dream home would still be the Brinca Dada Emerson Dollhouse, but unfortunately I could not find one anywhere.

The Malibu arrived from the UK within one week of ordering it, which was super impressive given the size and weight of the box.  After opening it, I was a little overwhelmed, I'm not going to lie, there were many, many pieces and a 20 something page instruction manual!
Take note, when the manual tells you to do a dry run first, as excited as you might be to put together your dream home, do the dry run first!!

My top tips for constructing this house:
1.  MOST IMPORTANT do the dry run first, leave all the sliding windows pinned to the frames as they don't all match.  Mark which windows fit which frames use any method that makes sense to you, but this is important to achieve a good end result.
2.  When you have the house sitting together (not glued) decide on a colour scheme for the facade.  I would have like to have kept some more of my facade with the natural wood showing (i.e.; the window frames).
3.  Note pieces that do not need to be painted, i.e. top and bottom edges that meet the floor or ceiling this will cut down the 3 or more coats of paint you are going to need.  
4.  I would recommend not painting the sliding window tracks or the windows themselves first off.  Once my house had its 3 coats of paint the sliding panels where not so 'slidey'!!!!
Next step.... paint, and sand, and paint and sand.... and continue painting and sanding until you are happy the walls are well finished.  You will be able to touch the walls up once it is constructed, but the majority of it will be easier to do while is is still in pieces.
As for paint, I had a lengthy discussion with the sales person at the paint desk at the local hardware store.  I was advised to use a semi-gloss, however it still has that chalky feeling and I am considering doing a final coat in a gloss finish.  Obviously if you plan to wallpaper every room the paint job will not matter as much, but I am after the crisp white wall effect.
Partial dry run of the build, windows and frames left unpainted- be sure to mark which window fits to which frame!

Progress shot with part of the facade taken removed.


Picture of how the exterior of the house currently looks.  I am still undecided as to how to finish the outside.  In trying to achieve a modern look, I wanted to paint the very inside of the window frames black.  I will add more photos of the house as the renovations continue.


Monday, 19 September 2016

Kmart Dollhouse Hack

How to make over the Australian Kmart Dollhouse for under $100

BEFORE                                             AFTER


The Budget :
Kmart Dollhouse $49
Wooden eBay kitchen $14.00
Sandpaper (180 grit) / cork block $5.70
White Knight Tester Paint Pot $7.25
Bedding Material $10.00
Box cutter/knife
or mini Stanley Handsaw $10.00
Spotlight Craft Glue $3.70

Total $99.65

The list above will give you everything you need assuming you have none of the above laying around the garage - you can always ask family members if they have some of the tools etc which you could borrow as this is a fairly small and simple project.  All the men in my family are metal workers and we still had most of this stuff laying around the house!

Firstly the best thing about the Kmart house is that it comes with furniture! and the wooden furniture is pretty indestructible for little hands.  I added the option of a full kitchen for my dollhouse, and made 2 small beds from balsa wood.

I brought my kitchen from Kidstuff at my local Westfield shopping centre (brand was called Saint Germaine) and was definitely a splurge item considering I sanded and repainted it anyway.  However you can buy a perfectly good wooden kitchen from Ebay.  I have brought the pink wooden kitchen from eBay and used both '9amfree' and 'aclmart' in China and they cost about $14 with free shipping.  The only other piece you may want to add is another bedroom/nursery set.

The other item you will need to decide on is wether you buy a handsaw or a box cutter.  A handsaw will easily chew through the wooden furniture if you are wanting to modify a few pieces.  I use my Stanley box cutter for everything!!  It is a great tool to use with balsa wood.  However the wooden furniture in this set may be a little too thick and strong for the box cutter and I don't want anyone chopping off a finger.

HOW TO RENOVATE THE FURNITURE

BEFORE


This is a flat lay of the furniture which comes with the house.  There is about 1 piece of furniture to each room so it does leave the house looking a little barren, which is why I decided to purchase a wooden kitchen.  I did made 2 small wooden beds as my daughter insisted there be a bed for her and her brother!


AFTER

Choose a colour scheme for the house and try to stick with it throughout, most commonly used colours in these renovations are white, grey, pink and black (try to stick to 3 colours if you are wanting the crisp Scandi look).  I kept my makeover simple by using white paint on the furniture as this tied in with the colours of the house as it is already mostly white.      


The first thing you need to do if you want to change the colour of this furniture is sand it.  Im not going to lie, this is hands down the most time consuming, boring part of the job.  I used a fairly aggressive sand paper (180 grit) and try and use a cork block so as not to dig trenches in the wood.  I suggest you grab a glass of wine and watch the kids run around the backyard for this part... you will probably need to set aside 2 hours for sanding.  I did cheat as I hate sanding and didn't sand the back, bottom or inside of any of these pieces  (naughty!)  but in all honesty if you do not sand off the original paint, it will leech though and the new paint will also scratch off.

Once you have given the old furniture a decent sand you can paint it.  Bunnings sell small test pots of paint (near the spray paint section) for under $10.00.  Make sure you buy a water based paint so it is kid friendly and also go for a 'gloss' finish.  Matt finishes feel chalky, will scratch and mark very easily.  You will most likely need to coats of paint on the furniture, but there is so little to paint that a test pot will easily see you through this project.


BEFORE and AFTER of the Saint Germaine kitchen set.


This is an after photo of the pink wooden eBay kitchen which I used in one of my previous houses.  For $14 this is an easy addition to your dollhouse, and the pink isn't that bad (considering it is a girls dollhouse!).

This is the large red set of draws which came with the dollhouse.  I used my handsaw to cut just under the first draw.

I turned the bottom half up the other way and cut out the back of where the 'middle' draw would have been.  This made another 2 sets of draws which I found to be a better fit in the house.  I used one in the very top room where the roof is slanting and hard to fit furniture into.


Next is to make over your little bed and couch.
Spotlight will let you buy as little as a 10cm strip of fabric (assuming you get a nice shop assistant.... sometimes they get a bit annoyed....)  The other option is picking out some quilting squares or 'Flat Fats' which are only about $4 each (pre cut fabric which measures approx 50cm x 50cm).   The swan pattern on my bed above was one of these precut quilting squares.  Another option is to cut up an old pillow case or buy a Kmart pillow case for as little as $5.

I recovered the couch using a strip of fabric and a good quality craft glue.  Both Bunnings and Spotlight sell craft glue suitable for sticking fabric to wood.  The Bunnings glue is called Boyle craft glue and is found near the balsa wood/craft/paint section or the Spotlight Crafters Choice 60ml clear craft glue.

Fill the remainder of the rooms with bits and pieces, swabs of fabric cut to make floor rugs, $2 shop fake flower/succulent arrangements make great indoor plants.  Cut pictures from childrens books or magazines to make wall art or search google images for great wall art finds.  Use scrap booking paper (available from Kmart, Reject Store, Big W etc) to add more colour to floor and walls.  Ensure you use a good quality craft glue (like the 2 brands mentioned above) to fix wall paper and flooring.  Childrens paper glue will not hold wall paper to the dollhouse.


Make up compacts make great bathroom mirrors!
I removed the middle walls in the bottom 2 rooms to add more space.