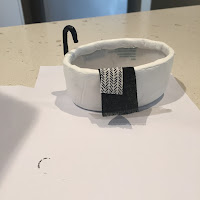
You will need- a plastic bottle, air drying clay, rolling pin, craft knife, baking paper.
Firstly you need to find a bottle which fits the space! I found this soap refill bottle to be perfect for my house, but on hunting around the house, there were numerous shampoo, baby wash, house cleaner bottles which would also work. The reason I used the soap bottle was that it was already white and the 'walls' seemed to mimic a bath perfectly.
You want to the cut the bottle in half first (or maybe 1/3rd of the way down). Put it back into the bathroom and look at it to see how high you want the walls to be, and look at it overall to try and get the scale oflength and height right
I found that scissors were slightly easier to cut around the top just taking small sections off at a time.
So if you wanted you could stop here - but I wanted my bath to look a little more life like so I added the clay to make the 'walls' of the bath look thicker and the texture to be more like porcelain.
Next break out the clay, if you haven't used air drying clay, it is quite different to the polymer clay which needs to be baked. It is a lot softer and sticky, so I rolled it out on baking paper to save it from sticking to the bench!
Firstly roll out a bit long snake, making it quite fat so that there will be enough clay to cover the walls of the bath. I rolled the snake out and then wrapped it around the bath to ensure it was long enough (although it will end up a bit longer once you start rolling it out).
Make sure you use plenty of clay so that the walls will be 'thick' NOTE: The clay will shrink on drying.
Place your snake on some baking paper and start rolling it flat, I found that rolling across it on 45 degree angle to work at first and then rolling the whole length of it.
This clay can be quite sticky so it might take a few attempts, and while you are messing about it will start drying and this also makes it easier to work with.
Once you have rolled it flat, lay the bath on top and ensure you have enough clay to cover the 'walls' of the bath and little left over to go over the lip.
I did not put any clay on the bottom of the bath because I was happy with the height. I also did not put any clay inside the bath, so it remains plastic, which means it could actually hold water!
Wrap the bath in clay and fold it over the lip, try and make the 'seam' of the clay at the back where it will be placed up against the wall. Do not push the clay hard onto the bath, the clay will shrink when drying so you need to make sure there is plenty of room between the clay and the plastic. You almost need the clay to be 'too big' or 'baggy' around the plastic container to take into account shrinkage.
Hopefully it is looking something like this now! I used my craft knife to trim the inside so that the clay was just under 1 cm from the lip of the bath.
Pat the sides down and smooth out any bumpy bits as best you can.
If you want a tap roll out another 'snake' and bend the top over like a walking cane. Ensure it is taller than the bath and that the end will actually be pointing into the bath!
Next - place it in a nice warm spot to dry for 24 hours.
Once the clay has dried you will need to sand it back to make it smooth. Make sure you use a fine sandpaper (150 grit) to ensure it does not make big scratches in the clay. If sanding does not remove all of the cracks you can refill them with more clay and stand to dry for a few hours.
Once sanded, give the bath a coat of white paint to make it nice and shiny.
If you have some scrap material, fray the ends and hand them over the bath as towels for decoration.


I admire oyu for making a bath tub... tried it a couple of times and failed badly :-( so I opted for a 3d printed one
ReplyDelete