Showing posts with label 1:12 scale. Show all posts

Thursday, 26 January 2017

No Sew Bedding


How to make dollhouse bedding without a sewing machine

You will need:-

- Good Quality Craft Glue or Fabric Glue (See my post on glue options here)
- Different fabric scraps to use as your bedding
- thick cardboard or poster board

Cut your fabric slightly larger than the size of the bed you require it to fit.

To give the effect of a sheet folded over a blanket/duvet cover, you can fold a plain white strip of fabric over the top of your chosen patterned bed cover.

You can simply glue the edges together with fabric glue so that you do not need to use a sewing machine.
 Fold the white 'sheet' over the top edge of your patterned fabric to create the look of a turned down bed.

I placed a small amount of quilting filling between my sheet and the poster board so that the bed looks nice and comfy, but you could also just fold some more fabric under the top cover to make it look a little more 'plump' as well.


Cut a piece of cardboard to fit your bed like a mattress, (so that it sits neatly on the top of the bed).

Fold your fabric over the cardboard and tuck the ends in similar to wrapping a gift.  You do not need to make the underneath all too tidy as you can stick it directly onto your bed base as shown in the diagram below.

You can also make some cushions using fabric glue.  The black and white cushion below is just a length of fabric rolled in a cylinder shape and glued along one edge.


Hanging Mirror

How to make a miniature hanging mirror

You will need:

Round Mirror (best place to find one of these is inside your make up compact case)
Orange Power Glue remover (or similar product which dissolves glue)
Poster Board or craft cardboard
Fast setting glue.

If you plan on using the mirror from your make up compact, the best way to detach the mirror is with using Planet Ark Orange Power stick spot glue dissolver.

Start by placing a few drops of glue dissolver around the edges of the mirror.  Using a knife or box cutter very gently slide the blade between the mirror and the compact so that the glue dissolver and run under the mirror to reach the glue.  Keep adding drops of glue so that it can run underneath the mirror.  Be patient and give the glue dissolver time to work.

Keep using the knife to gently try and pry the mirror off.

Once you have the mirror free from the compact you can measure a length of cardboard to use as your mirror hanger.

Use fast setting glue to attach the length of cardboard to the edge of the mirror - in effect the cardboard is just for show.  Always attach the mirror directly to the dollhouse as it is heavy and should be secure from children prying it off.


Monday, 21 November 2016

Jute Rug Tutorial


Step by step instructions on how to make a modern Jute Rug for your dollhouse.

What you will need:

- Thin cardboard (cereal box or similar) or thick scrapbooking paper ;

- Ruler;

- Jute rope;

- Double sided tape OR craft glue OR hot glue gun;

For the rug in this tutorial I used my glue gun - and now I have thrown it in the bin.  I don't know who thought a hot glue gun is a good idea but I personally think they are rubbish!  I thought  it might hold my super heavy duty Jute rope better (which I guess it did....) but they are just sooooooo messy, and you need to work very quickly as the glue drys way to fast, especially for this task which is a little tricky and you need a bit of time to make it look nice.

I have made jute rugs in the past and I think the easiest option is to use double sided tape, especially if you are using the thin Jute string.

Step 1

Start by measuring the space you want the rug to fit into so you can map this out on your cardboard.

Step 2

Draw a cross in the middle of your cardboard to give you a starting point and a guide to keep your circle even once you start glueing the Jute string down.  If you deicide to use double sided tape, which I would suggest as being the easiest way of doing this for first timers, start by laying the tape out on the cardboard in a asterisk (*) shape.

Place one end of the string across your centre +, you want the 'tail' to be a little long so that you can 'run it over' with your coil and this will hold and hide the end of the string in place.


Step 3

Start sticking the string down, wrapping it around itself.  If you are using double sided tape you can take your time to ensure you are keeping your circle even, and if you go a bit wonky it is easy to pull the string up and lay it back down again.


Step 4

Now if you have had enough of gluing and sticking string down you can simply stop at a simple circle shape.  (see step 5 on how I finish off the end to stop it unravelling).

But if you want to make it look a little more fancy, you can add smaller circles.  Start by laying one out to decide how big you want the decorative feature to be, then cut 10-15 strips of jute to the same size (you may require more or less).  Cutting lengths of jute for the smaller circles makes the jute easier to work with, as well as helping in getting similar sized circles.

Keep going all the way around, try to keep turning the rug so you are working on the space in front of you, adding the smaller circles around the boarder can be a little more fiddly but don't worry too much about the 'tail' ends and where they end up because if you do a 'boarder' you can 'run' them over and tuck them away.

You will see that some of my circles go in opposite directions, but just do what is easier for you as once you lay the boarder you can't really tell which way the circles are running.


Step 5 

To finish off it is best to try and tuck the 'end' back under the outside coil.  If you can get it tucked back in towards the middle of the rug you can just tape it to the under side of the rug.

Below are 3 different rugs which I have made, The first rug is made of 3 different types of string, Jute lace (found at the local junk shop) jute string, and cotton string.
Bottom rug is just thin jute string held down with double sided tape.  The big rug is made from jute rope and I just the hot glue gun as this string was far too heavy for double sided tape.


Sunday, 20 November 2016

Keeping it together

Which glue should I use?

I have had a lot of people ask me about which glue to use for various aspects of your dollhouse renovation.

And the easy answer is that there is one glue which I use for everything!

I recently brought a hot glue gun thinking I should invest in a serious tool for the amount of crafting I do and I was extremely disappointed.  Its messy, and it does not hold very well at all.  So if you were thinking of spending money on a hot glue gun, forget it!

Head to your local hardware store (Bunnings) or craft shop (Spotlight or Lincraft).

The best glue to use is a premium craft glue.  These craft glues bond pretty much everything and anything, fabric, balsa wood, poster board, scrap pad paper....

Hanging Wallpaper

The best way to give your dollhouse some character is by hanging some wallpaper.  My best tips for wallpapering your dollhouse are to use scrapbooking paper, again you can buy a whole book of scrap paper from your local craft shop (Spotlight, Lincraft and even Big W and Kmart sell a great range as well).  If you are after a wall tile print don't forget to check out my etsy shop.  If you decide to use normal xerox paper for wall paper this is also fine as long as you don't try and use childrens paper glue.  If you try and use cheap paper glue it may make the toner ink run and it will not stay stuck for long!

You really only need to dap a few decent sized dots of glue in each corner and a few through the middle.  If you are using a good quality craft glue this will be more than enough to hold it on the walls and also will not cause too much damage if you change your mind and want to remove it.

My two favourite options:

450 quick dry glue (I have purchased from Spotlight)


Boyle Craft Glue from Bunnings.  Both retail under $10 and will be more than enough to get you through a basic dollhouse reno.


Wednesday, 16 November 2016

Dollhouse Buyers Guide

So you want to buy (your child) a dollhouse.

You literally just walked through the door with your brand new baby girl, take a seat on the couch to research instagram for the latest and greatest baby products and you come across the modern dollhouse revival.

Firstly, YES of course you need a dollhouse in your life, (your two week old daughter may take a little more convincing) but hey, lets be honest this dollhouse business is not all entirely for the kids!

Where to start?

Serious consideration should be taken as to the type of house vs the age of your child.

Factors to consider:-
- Will the child actually play with the house
- Is the furniture and accessories safe and/or durable
- Are you going to paint/modify the house (re painting a house can be a lengthy process)
- How much money do you plan to spend

Also note that when buying these houses they are childrens toys and although I mention the scale as 1:12 they are a bit all over the place.  What I mean is that you will find that the ceiling height maybe very high and you only have a small amount of floor space.  The only dollhouse which is true to scale is the Lundby and their accessories.

I have given a brief run down on 4 options which are all available in Australia as I have owned all of theses houses so find it easier to give a review of them.  There are numerous other brands available which you should also research, not to mention local Instagram and Etsy stores.

The Kmart Dollhouse
A great starting point for very young children would be the Kmart dollhouse.  It is well priced for the quality, it includes some furniture and most of all it is pretty indestructible.  Should you wish to pretty it up a bit read my blog on The $100 Kmart Dollhouse Hack.  The Kmart house would suit 1:12 scale furniture, although the rooms are very small so you will not be able to fit too much into it.  Stick to buying the wooden furniture packs (i.e.; Le Toy Van, Hape or Saint Germaine).


Adairs Kids Heidi House
Next best option for beginners is the Adairs Heidi House, and you can buy a set of wooden furniture that goes with it.  This option is much larger than the Kmart house, the rooms can fit considerably more furniture into them.  Again for smaller children stick to the wooden furniture packs, but this house will easily accommodate any 1:12 scale dollhouse furniture.


IKEA Dollhouse Shelf
For some reason IKEA designed this as a bookshelf but it works brilliantly as a dollhouse.  Again this house is on the smaller side as it only has 4 rooms, and it is not very deep.  Will suit either wooden furniture packs or 1:12 scale furniture.  The advantage of this house is that it can be easily painted as it has a wood finish.  The other houses will need to be sanded and primed before they can be painted.


Lundy Smaland or Stockholm

I have owned both the Smaland and the Stockholm and loved both of them for different reasons.  The Smaland has plenty of rooms, and realistic opening doors and windows.  On the other hand the Stockholm has that amazing draw which hides a swimming pool (capable of holding water!!) and the trendy modern layout with rooftop verandah.  The only downside to the Lundby is that because of the 1:16 scale you are a little more restricted as to your furniture options and are best to stick with buying original Lundby products.  As the 1:16 scale is slightly smaller the Lundby (in my opinion) would be better suited to older children (say 4 years onwards) only because the Lundby furniture has far more detail and would be more practical for older kids.


Filling your house with modern minis
Once you have decided on the type of house you think will best suit your needs, you can finally move on to decorating it.  As I mentioned before, these houses are toys so scale can play up a bit when trying to figure out whether furniture is going to fit into your rooms.

First of all if you want to paint your house decide this first as it is fair easier to paint a house while it is deconstructed.  If it is already painted you will need to sand it first, prime and then paint.  This is a huge task so really take this into consideration when buying a house.

Start with deciding on whether you want to change the wall paper, try to use scrap booking paper and a good quality craft glue for the best results.  Flooring can be laid using balsa wood and I have a 'how to' on my blog.

Even if you buy all your major furniture pieces in packs, seek out local makers for all the pieces that really give it the modern twist, like miniature plants, floor rugs, wall art and of course bedding, cushions and throw rugs.

There are so many amazing mini makers on Instagram and Etsy so make sure you shop around and support your local mini makers!!!

Dollhouse comparison table


Scale
Furniture included
Age
Can it easily be renovated
Stairs
KMART
1:12          
Yes
2+
Yes
Yes
IKEA
1:12
No
2+
Yes
No
ADAIRS
1:12
Extra
2+
Yes
Yes


LUNDBY
1:16
Extra
4+
Wallpaper only
Yes

Sunday, 2 October 2016

Malibu Beach Dollhouse Kit


After several attempts at trying to build my own modern dollhouse (and failing!), I decided to splurge on the Malibu Beach Dollhouse Kit from The Dollhouse Emporium in the UK.  The reason for choosing this house, pretty simple, it was on sale and they would actually ship it to Australia.  There are several other houses which I found and really loved the design of, but actually being able to buy one and have it delivered was another story.  My dream home would still be the Brinca Dada Emerson Dollhouse, but unfortunately I could not find one anywhere.

The Malibu arrived from the UK within one week of ordering it, which was super impressive given the size and weight of the box.  After opening it, I was a little overwhelmed, I'm not going to lie, there were many, many pieces and a 20 something page instruction manual!
Take note, when the manual tells you to do a dry run first, as excited as you might be to put together your dream home, do the dry run first!!

My top tips for constructing this house:
1.  MOST IMPORTANT do the dry run first, leave all the sliding windows pinned to the frames as they don't all match.  Mark which windows fit which frames use any method that makes sense to you, but this is important to achieve a good end result.
2.  When you have the house sitting together (not glued) decide on a colour scheme for the facade.  I would have like to have kept some more of my facade with the natural wood showing (i.e.; the window frames).
3.  Note pieces that do not need to be painted, i.e. top and bottom edges that meet the floor or ceiling this will cut down the 3 or more coats of paint you are going to need.  
4.  I would recommend not painting the sliding window tracks or the windows themselves first off.  Once my house had its 3 coats of paint the sliding panels where not so 'slidey'!!!!
Next step.... paint, and sand, and paint and sand.... and continue painting and sanding until you are happy the walls are well finished.  You will be able to touch the walls up once it is constructed, but the majority of it will be easier to do while is is still in pieces.
As for paint, I had a lengthy discussion with the sales person at the paint desk at the local hardware store.  I was advised to use a semi-gloss, however it still has that chalky feeling and I am considering doing a final coat in a gloss finish.  Obviously if you plan to wallpaper every room the paint job will not matter as much, but I am after the crisp white wall effect.
Partial dry run of the build, windows and frames left unpainted- be sure to mark which window fits to which frame!

Progress shot with part of the facade taken removed.


Picture of how the exterior of the house currently looks.  I am still undecided as to how to finish the outside.  In trying to achieve a modern look, I wanted to paint the very inside of the window frames black.  I will add more photos of the house as the renovations continue.


Wednesday, 31 August 2016

How to make a modern miniature toilet

Seeing as my dollhouse is modern style, I wanted my toilet to be 'floating' or 'wall hung'.

For some reason I have got into carving balsa wood, probably because I have accumulated sooooo much of it doing all these dollhouse renovations and I'm getting sick of everything being square!

So tools needed for a modern toilet - a block of balsa wood, this one started at roughly 6cm x 3cm.  Remember balsa is very soft wood so it is easy to cut and sand and that makes it my preferred choice of wood to use as you don't need power tools.

Other tools needed are a box cutter, small hand saw, sand paper, pen.

Get out your ruler and briefly measure the area you want the toilet to be placed to get an idea of the overall size.  My toilet is going to be about 3cm x3cm square and about 2cm in height.


I googled modern toilets to get an idea of a shape I wanted to use.  I then briefly sketched a pattern onto the outside of the wood block.

Try and use a handsaw to cut off as much excess wood as possible.  Then with the box cutter start by cutting off the corners to make more of a curved corner.

I started with a 'back' on the toilet but went a bit crazy with the craft knife and accidentally cut if off.  I should have cut the back in with my hand saw....


Once you have cut most of the wood away you can use a corse sandpaper to even out all the bumps.  I find it easier to hold the sandpaper on the bench and rub the wood over the sandpaper.  If the sandpaper is flat on a bench it sands more evenly.  Course sandpaper can leave big scratches so be careful not to push too hard.  Once you are happy with the shape finish off with a finer sandpaper to give a nice smooth finish.


This is how I will mount it after I have painted it with some white paint.  I will add finished photos when the bathroom is complete.

Saturday, 25 June 2016

How to make a modern miniature shower head

 You will need: 

- 5mm round dowel
- square dowel or scraps of dowel
- box cutter
- bottle top


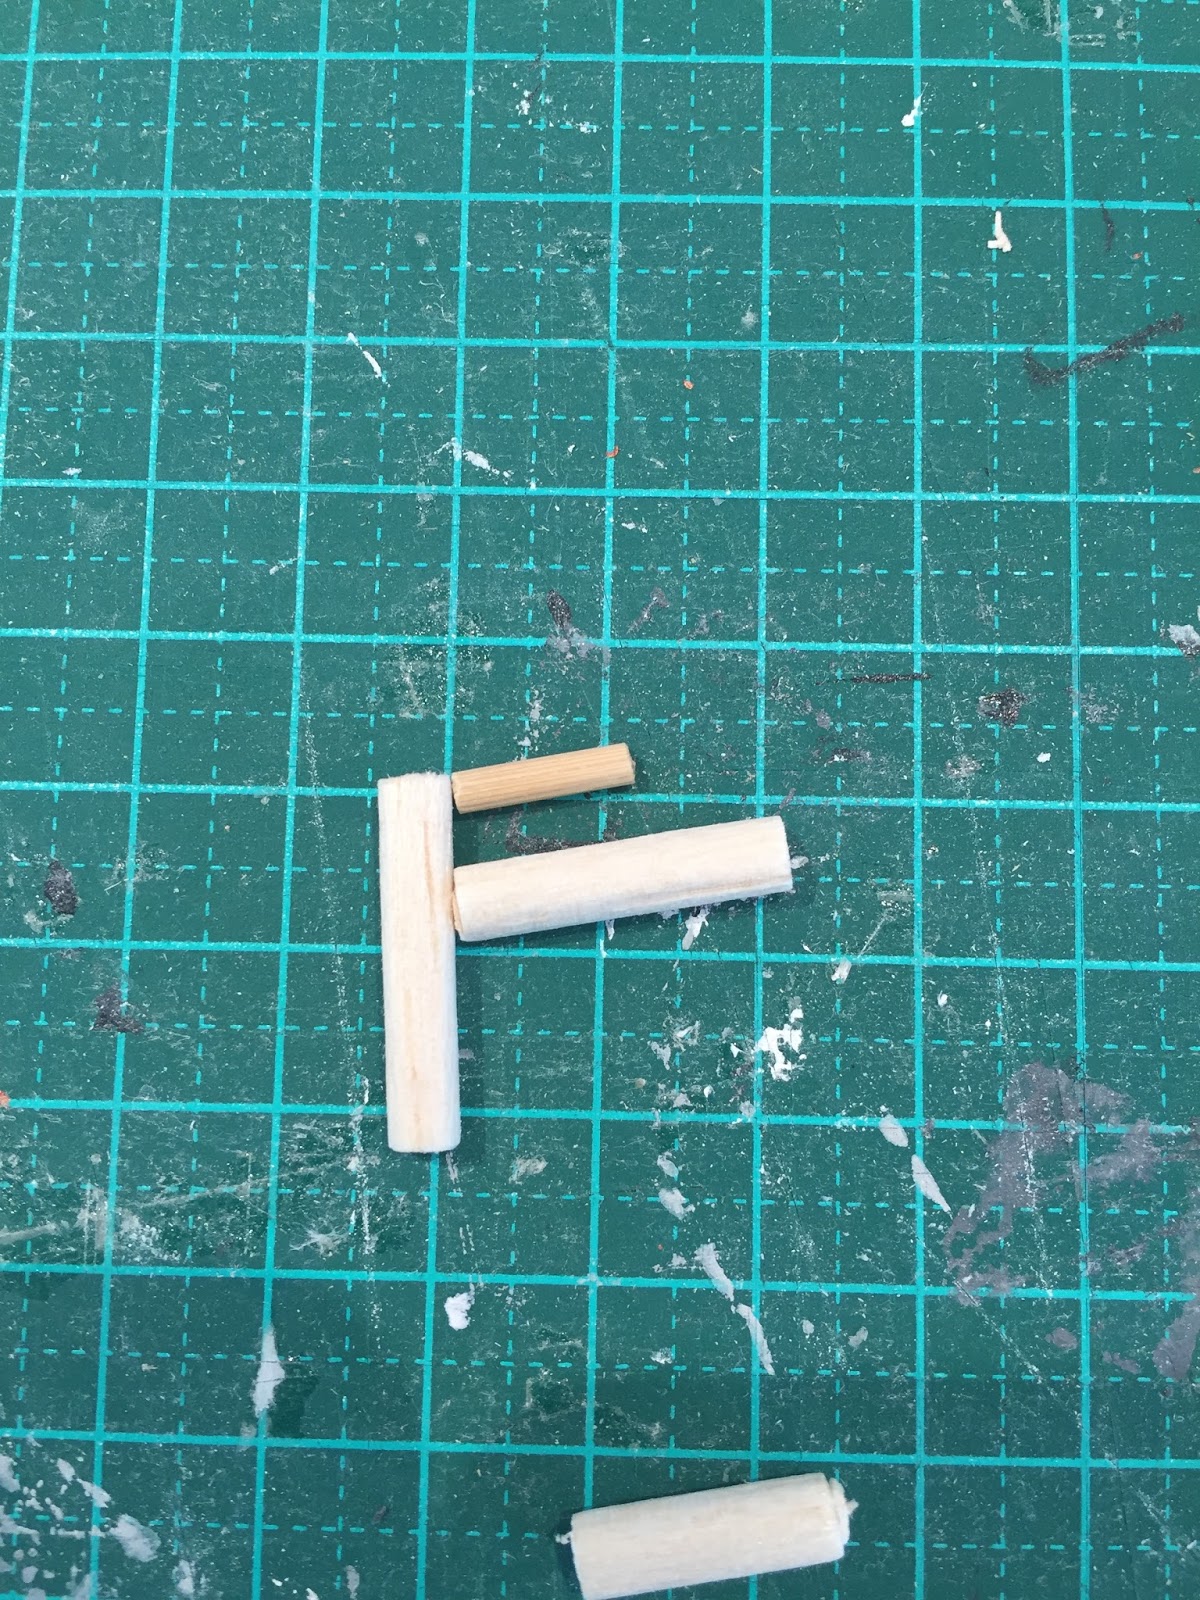
First of all I made the shower head.  I just cut two pieces of dowel into oblong shapes.


Glue the shower head together using a good quality balsa/craft glue.  Once dried I used sandpaper to sand all the sides down to make it look 'rounder'.
Next move onto the waterfall shower head.  I already had a precut round piece of balsa wood.  You could either trace around a bottle top and cut out a piece of balsa or you could use a plastic bottle top.

Cut some sections of round dowel to construct the shower rail as show in the picture below.


Modern Miniature Bathroom Sink

 You will need 
- Balsa wood
- Cardboard tube
- Craft glue
- Box cutter

Cut two sides out of balsa wood approx 4cm x 4cm
Cut top and bottom out of balsa wood approx 8cm x 4cm
On this cabinet I tried to mitre the edges to that it fits together seamlessly on the corners.  I just rubbed the corners across sandpaper to get an angle on the edge.  But the cabinet can be joined easily without changes the corners.

Cut a small section from your cardboard tube.  My cardboard tube is the inner from a roll of garbage bags.
Glue your cabinet together using a good quality balsa/craft glue and allow to dry.

Once dry you can paint the cabinet.  I like to stain the balsa wood light brown.  I use just a tiny spot of brown acrylic paint and mix it with about 50ml of water.


Its best to paint some test wood first to see what colour you like.  Once the stain dries you can do another coat if you want to make it darker.

Paint the cardboard tube white to make a basin and add a tap.  (Details to make a tap can be found here)

Friday, 24 June 2016

How to make modern miniature taps

 To make a modern miniature tap, I used:
1.   Round dowel (5mm) but you could use a paper straw (not plastic as you will not be able to paint it).
2.  BBQ skewer
3.  Craft glue


 First step is to cut 2 pieces of dowel.  One for the base of the tap and the second for the 'tap' part.  I started with both pieces being 3cm but you can trim them down to suit the size of your kitchen.

Next cut a small piece of BBQ skewer for the tap handle.  The two different size dowel and skewer give the effect of a tap.

Lay the pieces out so you can get and idea of scale and how you want it to look.


I used the sharp end of the skewer to make a small hole in the stand of the tap.  This will help attach the handle.


To attach the tap onto the base, I folded a piece of sandpaper in half and made a small notch on one end.  This is so that the tap will sit nicely on the round dowel of the base.

Glue the handle and the tap to the base, wait until glue dries and then paint either silver or black.